Crosby Fist Grip Wire Rope Clip Application Instructions
Efficiency ratings for wire rope end terminations are based upon the minimum breaking force of wire rope. The efficiency rating of a properly prepared loop or thimble-eye termination for clip sizes 1/8” through 7/8” is 80%, and for sizes 1” through 3-1/2” is 90%.

G-450 (Red-U-Bolt®) & SS-450 (316 Stainless Steel)

- Failure to read, understand, and follow these instructions may cause death or serious injury.
- Read and understand these instructions before using clips.
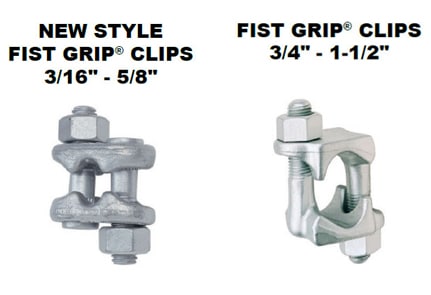
- Match the same size clip to the same size wire rope.
- Do not mismatch Crosby clips with other manufacturer’s clips.
- Prepare wire rope end termination only as instructed.
- Do not use with plastic coated wire rope.
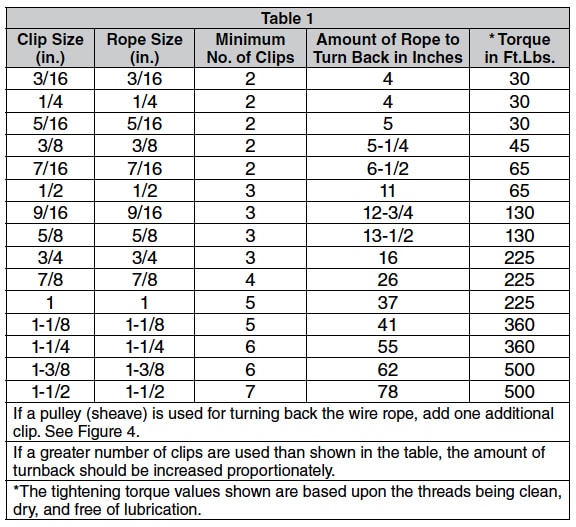
- Apply first load to test the assembly. This load should be of equal or greater weight than loads expected in use. Next, check and retighten nuts to recommended torque (See Table 1).
Efficiency ratings for wire rope end terminations are based upon the minimum breaking force of wire rope. The efficiency rating of a properly prepared loop or thimble-eye termination for clip sizes 1/8” through 7/8” is 80%, and for sizes 1” through 3-1/2” is 90%.
The number of clips shown (see Table 1) is based upon using RRL or RLL wire rope, 6 x 19 or 6 x 37 Class, FC or IWRC; IPS or XIP, XXIP. If Seale construction or similar large outer wire type construction in the 6 x 19 Class is to be used for sizes 1 inch and larger, add one additional clip. If a pulley (sheave) is used for turning back the wire rope, add one additional clip.
The number of clips shown also applies to rotation-resistant RRL wire rope, 8 x 19 Class, IPS, XIP, XXIP sizes 1-1/2 inch and smaller; and to rotation-resistant RRL wire rope, 19 x 7 Class, IPS, XIP, XXIP sizes 1-1/2 inch and smaller.
For other classes of wire rope not mentioned above, we recommend contacting Crosby Engineering to ensure the desired efficiency rating.
The style of wire rope termination used for any application is the obligation of the user.
For OSHA (Construction) applications, see OSHA 1926.251.
Instructions
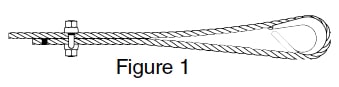
1. Refer to Table 1 in following these instructions. Turn back specified amount of rope from thimble or loop. Apply first clip one base width from dead end of rope. Use torque wrench to tighten nuts evenly, alternating from one nut to the other until reaching the recommended torque. (See Figure1)
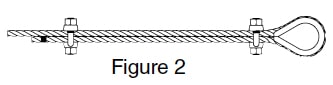
2. When two clips are required, apply the second clip as near the loop or thimble as possible. Use torque wrench to tighten nuts evenly, alternating until reaching the recommended torque. When more than two clips are required, apply the second clip as near the loop or thimble as possible, turn nuts on second clip firmly, but do not tighten. (See Figure 2)
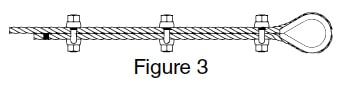
3. When three or more clips are required, space additional clips equally between first two – take up rope slack – use torque wrench to tighten nuts on each clip evenly, alternating from one nut to the other until reaching recommended torque. (See Figure 3)
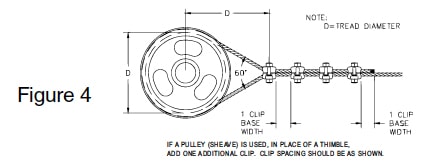
4. If a pulley (sheave) is used in place of a thimble, add one additional Fist Grip. Fist Grip spacing should be as shown. (See Figure 4)
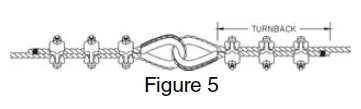
5. Wire rope splicing procedures: The preferred method of splicing two wire ropes together is to use inter-locking turnback eyes with thimbles, using the recommended number of clips on each eye (See Figure 5).
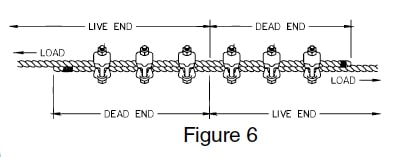
An alternate method is to use twice the number of clips as used for a turnback termination. The rope ends are placed parallel to each other, overlapping by twice the turnback amount shown in the application instructions. The minimum number of clips should be installed on each dead end (See Figure 6). Spacing, installation torque, and other instructions still apply.
6. Important: Apply first load to test the assembly. This load should be of equal or greater weight than loads expected in use. Next, check and use torque wrench to re-tighten nuts to recommended torque. In accordance with good rigging and maintenance practices, the wire rope end termination should be inspected periodically for wear, abuse, and general adequacy.