
How to Install U-Bolt Wire Rope Clips
A step-by-step guide to maximize your wire rope’s strength and prevent accidents and injuries.
Transcript
Why Proper Wire Rope Clip Installation Matters
– Terry, what happens if someone installs a wire rope clip incorrectly?
– You could have damage to property, you could have injury to self or to other people. How do you like lawsuits?
– And that’s why today, we are going to show you how to properly install a wire rope clip step by step.
My name is Ben, and this is the Lifting & Rigging Channel®. I’m here with Terry Driscoll, Mazzella Regional Sales Manager and AWRF board member. And today, we’re going to show you how to properly install wire rope clips.
Now Terry, you’ve seen firsthand what happens when someone installs a wire rope clip incorrectly.
– So people might not understand the proper way to install a drop forged clip, or it was passed down from generational knowledge. But if it’s not installed properly, you could have of course damage to property, you can have injuries to self or to other people around you. So making sure that it’s installed properly is paramount.
Forged vs. Malleable Wire Rope Clips
– So there’s a couple different kinds of wire rope clips. There’s forged and then there’s malleable. What’s the difference between those two?
– Drop forged of course, is more prominently utilized when it comes to any type of tensioning type systems or pulling.
If you’re talking about a malleable clip, now of course, that is something that you would want to utilize for maybe like handrails or guardrails or something of that sort, something that’s not going to see a lot of stress. And the reason is the metal that it’s made from tends to be a little bit more brittle. It’s not going to hold up compared to like a drop forged clip.
– So how do you know when you should use one or the other?
– Well, when in doubt, I would go with a drop forged clip.
– So basically like a malleable is more for maybe around the house or a home or–
– Throwaway type application–
– Yeah.
– If someone is suspending maybe some lights in a grocery store or something of that sort.
– Okay, but if it’s a critical application–
– Drop forged clip would be the best.
U-Bolt vs. Fist Grip Wire Rope Clips
– Now you got two different kinds of forged clips. So can you tell me about this one versus this one here?
– So you do have the traditional U-bolt or the drop forged clip, and then of course, the fist grip clip. You’ll notice that on the fist grip clip, we happen to have two different saddles on it compared to one specific saddle.
Really, a lot of it tends to be preference than anything else. You do have a wider variety of drop forged clips, where we can go upwards of three and a half inch diameter, compared to stopping at one and a half inches on the fist grip style clips. These will also probably tend to be a little bit more expensive, but I’m not going to say that it makes it foolproof, but it’s a lot easier on the install without any type of second-guessing.
What “Never Saddle a Dead Horse” Means for Wire Rope Clips
– What do you mean by foolproof?
– You may have heard the old adage, never saddle a dead horse.
– Yes.
– So when someone is taking wire rope, and they’re turning it back on itself to form an eye, they may have a tendency to put the saddle of the drop forged clip onto that dead end or the short portion of that wire rope. And if that happens, now, of course, we’re going to be causing some damage to the actual live line with that U-bolt as it’s being torqued onto that rope, and you could have a possible premature failure.
Parts of a Wire Rope Clip Explained
– So I guess real quick, we probably should talk about then what are the pieces and parts to this wire rope clip? So I’ve always heard the term, never saddle a dead horse. And you look at this, and you go, well, is this the saddle or is this the saddle? So I think that’s probably where a lot of the mistakes come in.
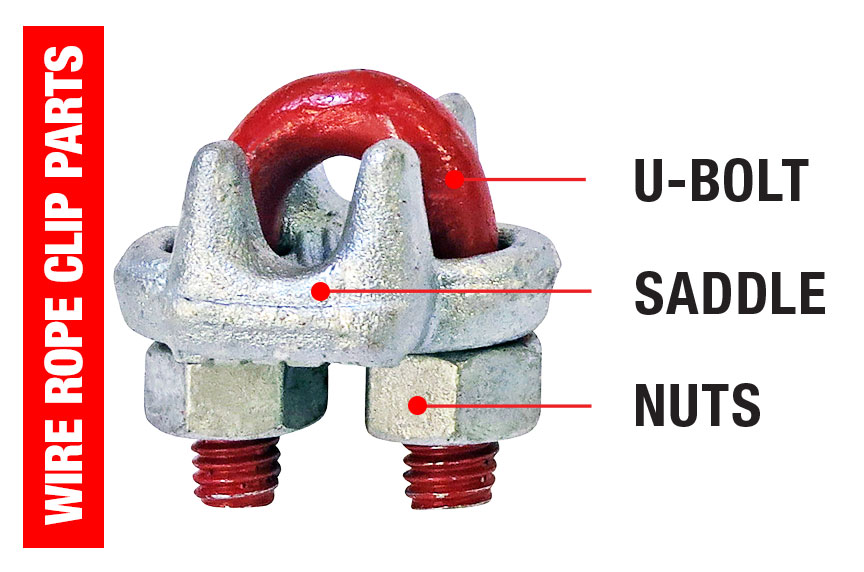
– You’re correct, sir. So, of course, we’ve got our red U-bolt here, our nuts that we have, and of course, the saddle. This is the saddle. This is where a lot of the question marks come into play.
– You have a double saddle clip or a fist grip. It’s basically just two saddles, right? So you don’t have to worry about which end this is going to go on.
– That is correct.
– Can you use this for any application that you would use a U-bolt style clip?
– Yes, you can. There might be some, again, limitations with the size, since this stops at one and a half inches, but they’re interchangeable.
How to Install U-Bolt Wire Rope Clips (Step-by-Step)
– Today, we’re going to show you how to install the U-bolt style clips.
All right, Terry, you’re going to walk us through the step-by-step process of how to install U-bolt style wire rope clips. So why don’t we start again with the never saddle a dead horse. What’s the dead horse?
– The dead horse, well, as soon as we start turning back the wire rope, you’ll notice that we have this dead end here. Of course, right below it, we have the live line that’s going the length of that assembly that we’re about to make. So the dead end would be this short little section up on the top where we’re going to be turning it back.
– So to be clear, the U goes on the dead end, the saddle goes on the live end.
– Correct. And if you take a look at the saddle itself, we have these nice grooves to it. So we’re not trying to destroy the wire rope itself, but we do want to have a sort of a crushing effect on the top as soon as we start torquing down the U-bolt portion of it so that it will help bind everything in place and keep it in position.
– Okay, so why don’t you just walk us through, and if I have any questions, I’ll just ask you while you’re going through it.
How Much Turnback Does Your Wire Rope Clip Assembly Need?
– So we have a 9/16 6×36 IWRC, independent wire rope core. We are starting our turn back, as you can see, right at the base here, we have about a base length. We have 12 inches minimum, which is required for our turnback.
– So how do you know that? How do you know what the minimum turnback length is supposed to be?
– Well, I’m going to give you a little bit of a shameless plug here for a key vendor of Mazzella, happens to be The Crosby Group. They are, I believe, the one and only manufacturer that is actually publishing all of that proper information on every single one of their clips that they sell.
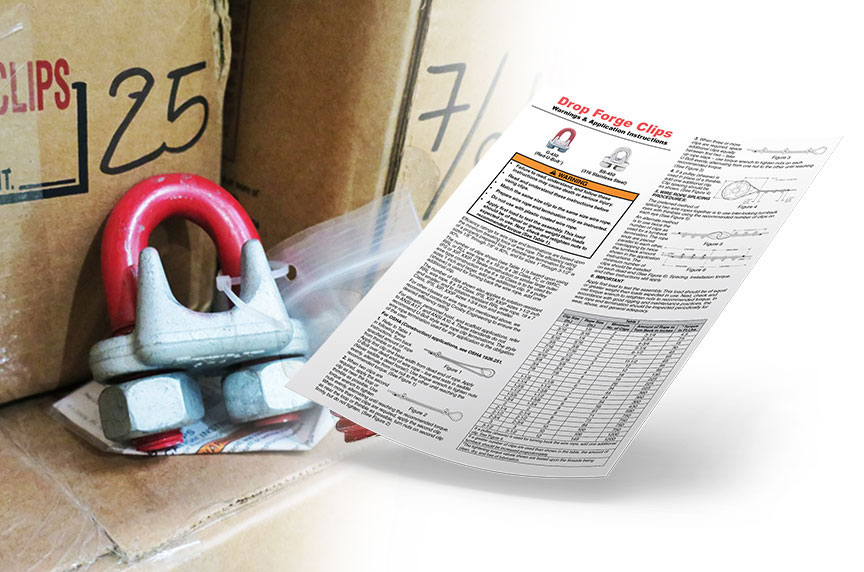
And if you take a look at that bag there, if you wouldn’t mind holding it up, notice all kinds of pertinent information on it that is explaining the do’s and don’ts of drop forged clips and fist grip clips. So every single one of their clips is bagged and tagged with all of this pertinent information on it.
Right now, what you want to do is just get things hand-tight, ’cause you want to start at the very end first. And once we get that towards the end, then of course we’re going to be moving closer to the front, where we would be positioning a thimble eye.
Do You Need a Thimble for Wire Rope?
So here we have a heavy duty thimble, dropping in our heavy duty thimble into this. And if you wouldn’t mind opening up another one of those bags, sir.
– So what’s the purpose of the thimble? Do you have to have a thimble?
– You don’t have to have a thimble. I would recommend the thimble. And the reason is it’s going to help protect that wire rope for any type of additional abrasion that you might be receiving. Metal on metal abrasion.
U-bolt.
– U-bolt.
– Now we need our nuts.
– Here’s a nut.
How Close Should the Wire Rope Clip Be to the Thimble?
Then how do you know how close you’re supposed to get this clip to your thimble?
– So the second clip that we’re installing is going to be as close to the base as possible.
How Many Wire Rope Clips Do You Need for an Assembly?
Now start tightening it down by hand. And now, of course, for our last clip that we’ll have, we’re going to make sure it’s evenly spaced in between the two that we already have in place. So we can open up another bag.
– So how do you know how many clips you need?
– Once again, all of this information is going to be found from the manufacturer itself or on the back of any of these bagged and tagged clips that we’re getting from The Crosby Group. Or you can check OSHA 1926.251 for that information.
U-bolt. Make sure we’re evenly spaced.
How to Properly Torque Wire Rope Clips to Manufacturer Specs
Now Ben, I’m going to ask you a question.
– Yeah.
– You strong enough and feel good enough by the fact that you hand tightened these last couple of bolts?
– To put my life into this holding me?
– Correct.
– Absolutely not.
– Absolutely not. Well, that’s why we still have an additional step that we have to perform, and that is torquing each and every single one of these nuts down to the specifications required by the manufacturer.
– Now I’m going to ask you, and I’m going to take a guess at where you can find this information. How do you know how tight it should be, how much to torque it to?
– And well, if you take a look at the nice little bags that you were just busy opening up, you’re going to see that we have a 9/16. It told us the 12 inches of the turnback, and it’s also telling us 95 foot-pounds per nut that we have.
– Okay, now how do you know if you’re torquing it down to 95 foot-pounds?
– Well, that’s why we actually have a calibrated torque wrench. So we’re going to be alternating between the two different nuts that are on the drop forged clip, easing in on one, easing in on the other. And we’re trying to close everything down nice and even.
So we would actually lock it into 95 foot-pounds here. And then of course, once you hit that portion of it, it’s actually going to either, one, stop or it’s going to start clicking a little bit different than what it was.
– So if I just got a regular old socket wrench, a drill, or something, and then torqued these down tight, don’t use that, right?
– You can utilize to get down to what you believe is the rated foot-pounds. But unless you have this, you don’t know. So you’re putting yourself at risk.
– Right.
– I would recommend against it.
Why Retorquing Wire Rope Clips After Load Application Is Critical
– And once we get it torqued down, then we’re done, right? We wash our hands and we walk away from it.
– Well then, of course, we’re going to apply a load to it. We’re going to make sure everything’s seated properly, and then we’re coming back in with round two of our torque wrench.
– So it’s an important second step, often skipped second step, I’m guessing.
– Yes sir.
– You’re not done yet. You have to put a load and test it and then torque it again.
– Once you apply a load, it’s actually going to seat, and at the same time may take out some of that constructional stretch. So you have to make sure everything is retorqued a second time.
Can You Use Too Many Wire Rope Clips?
– Now a couple other questions while you’re doing this, Terry. Is there such thing as too many clips? Can you put on like, that you’re like, “I don’t know how many clips I’m supposed to use. I’ll put five.”
– It depends on how long your tail is, but there is. Really don’t overcomplicate the assembly. If you’re thinking that more clips are going to keep everything into place better, you may actually damage the wire rope a little bit more.
What a Properly Torqued Wire Rope Clip Assembly Should Look Like
As you can see, I mean you probably notice there’s a little bit of a difference now to this assembly from where we started.
– You got kind of a bump between the rope here. It’s supposed to look like that?
– It’s exactly what it’s supposed to look like. We want to see deformation in that rope on that top dead end. The clip itself when we were looking at the saddle, notice that it had the grooves in it to accommodate that wire rope body from just resting into it. So we are protecting that base layer, which is part of that live line.
We want to see the crushing effect up through here, which is going to indicate number one, that it’s seated properly, but also that these clips are going to do what their intended purpose is, and that’s to hold that load.
When I go out in the field and see a perfectly straight assembly that has drop forged clips on it, that is a huge indication that they probably did not torque these down properly.
Why You Should Not Alternate Wire Rope Clip Direction
Some people think that you shouldn’t see that arch, so what they might do instead is alternate the clips.
– Why don’t you alternate the clips?
– Well, right now, as it stands, this is actually rated at about 80% of the break strength of the wire rope. And that depends on what size drop forged clip you’re using.
So if we’re looking at anywhere from up to 7/8 diameter, that’s still going to be 80% of the breaking strength of the wire rope. If we start going above that one inch and above, then you’re looking at 90% of the efficiency of these particular clips.
But alternating it like that, and from years past, we have actually shown customers that were doing it on river docks, they just thought it was going to make it stronger by switching it up. You could see how awkward it is now with the bends that we have in that particular setup.
– And I can see a lot of people going, “I don’t remember which part, do you saddle the dead horse or you don’t saddle the dead horse. I’ll just–“
– “Alternate it and just get it over with,” right? They were having premature failures, couldn’t understand what was going on. They were weakening their rope. That’s a big no-no.
Final Retorque Step and Safety Recap
– So what’s the next step?
– We’re going to apply a load, pretty much working load of what the 9/16 wire rope would be and then we’re going to retorque those clips again.
– If you ever need to figure out how to properly install a clip, refer back to this. An improper installation can put your equipment and your lives at risk.
If you need wire rope clips, you can shop for them at mazzellacompanies.com or contact us below for any of your lifting needs.
If you found this video useful, informative, entertaining, or you just feel like being friendly, then hit that like button so we can get this information out to everyone who needs it. Subscribe and hit the bell so you never miss a video. Remember, safe rigging is smart rigging. My name is Ben, stay safe out there.
I love doing stuff like this on camera, because I definitely don’t get trolled about how terrible I am at it afterwards.
– So whoever thought 9/16 was a good idea…
Did you know that an improper wire rope clip installation can reduce your rope’s working load limit by up to 40%? But with a properly installed wire rope clip, you can achieve between 80-90% efficiency of the rope breaking strength, depending on the diameter of the wire rope.
Wire rope clips are a common rigging tool used to connect two cable ends together to form the eye of a wire rope or cable assembly. When used and installed correctly, wire rope clips spread the force over a larger area on the live end of the wire rope, maximizing your rope’s strength. They are seen as an alternative to permanent wire rope sleeves—making it easy for riggers to install or remove them.
While clips are common, many riggers do not install them properly, opening the door for the rope to fail and cause damage or injuries to workers. Not torquing them properly and installing them the wrong way are the most common problems we see.
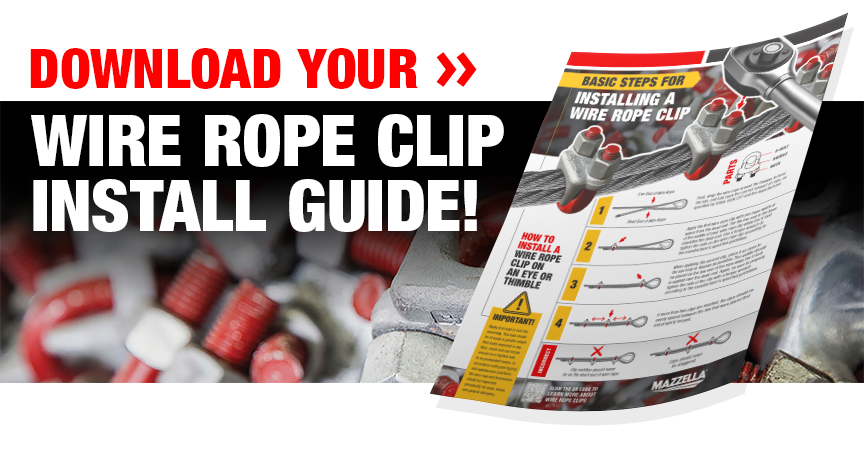
With the help from Mazzella’s in-house rigging experts, this article will offer a step-by-step guide on how to properly install U-bolt wire rope clips. We will also go over relevant terminology, different clip configurations, and best practices to keep in mind.
What are the Different Types of Wire Rope Clips?
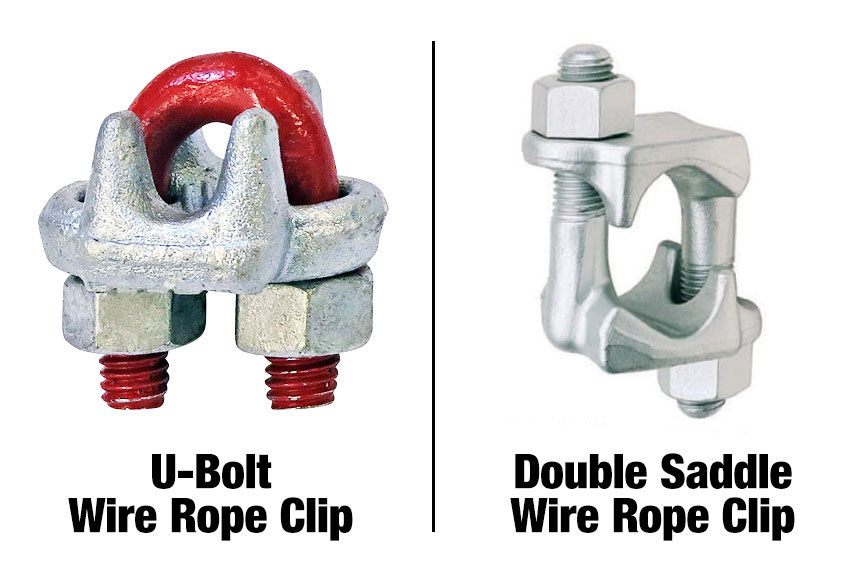
There are two basic wire rope clip designs: U-bolts and double saddles.
U-bolts, sometimes called “Crosbys” by the end user, are the most common clip orientation in the field. Double saddle wire rope clips, also called “Fist grip clips,” have two saddles, one on top and one on the bottom. While both have equal efficiency ratings, each wire rope clip model has slightly different installation steps.
This article will only focus on steps for U-bolt clips, as double saddle clips are considered “dummy proof” and easier to install, as the double saddle design removes doubt on the proper orientation of the wire rope clip during installation. Most issues in the field involving improper wire rope clip usage stem from U-bolt clips.
What Is the Difference Between Forged Wire Rope Clips and Malleable Wire Rope Clips?
As their name implies, forged wire rope clips were designed for more critical applications, with heavy duty projects in mind, like overhead lifting. Forged clips have a thicker profile and can carry much more weight than malleable clips. This makes them great for use on guy lines, towing lines, scaffolding, support lines, and other applications.
On the other hand, malleable clips are made from thinner material, and they are mostly used for making eye termination assemblies with right regular lay wire rope. Malleable clips are commonly used for light-duty, non-critical applications, like guard rails, fencing, and handrails.
How To Install U-Bolt Wire Rope Clips
1. Never Saddle a Dead Horse
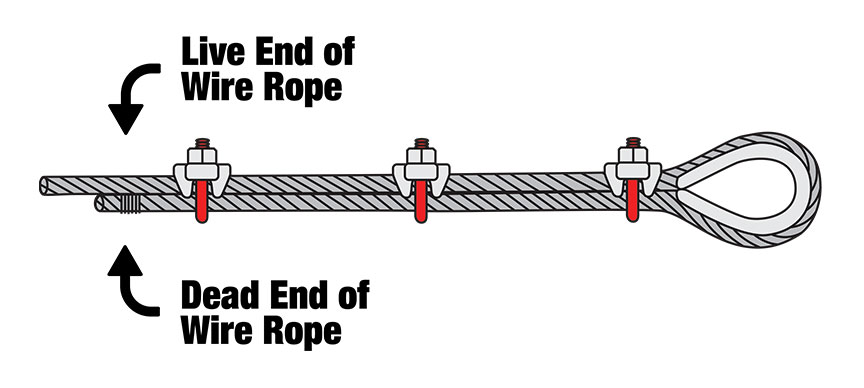
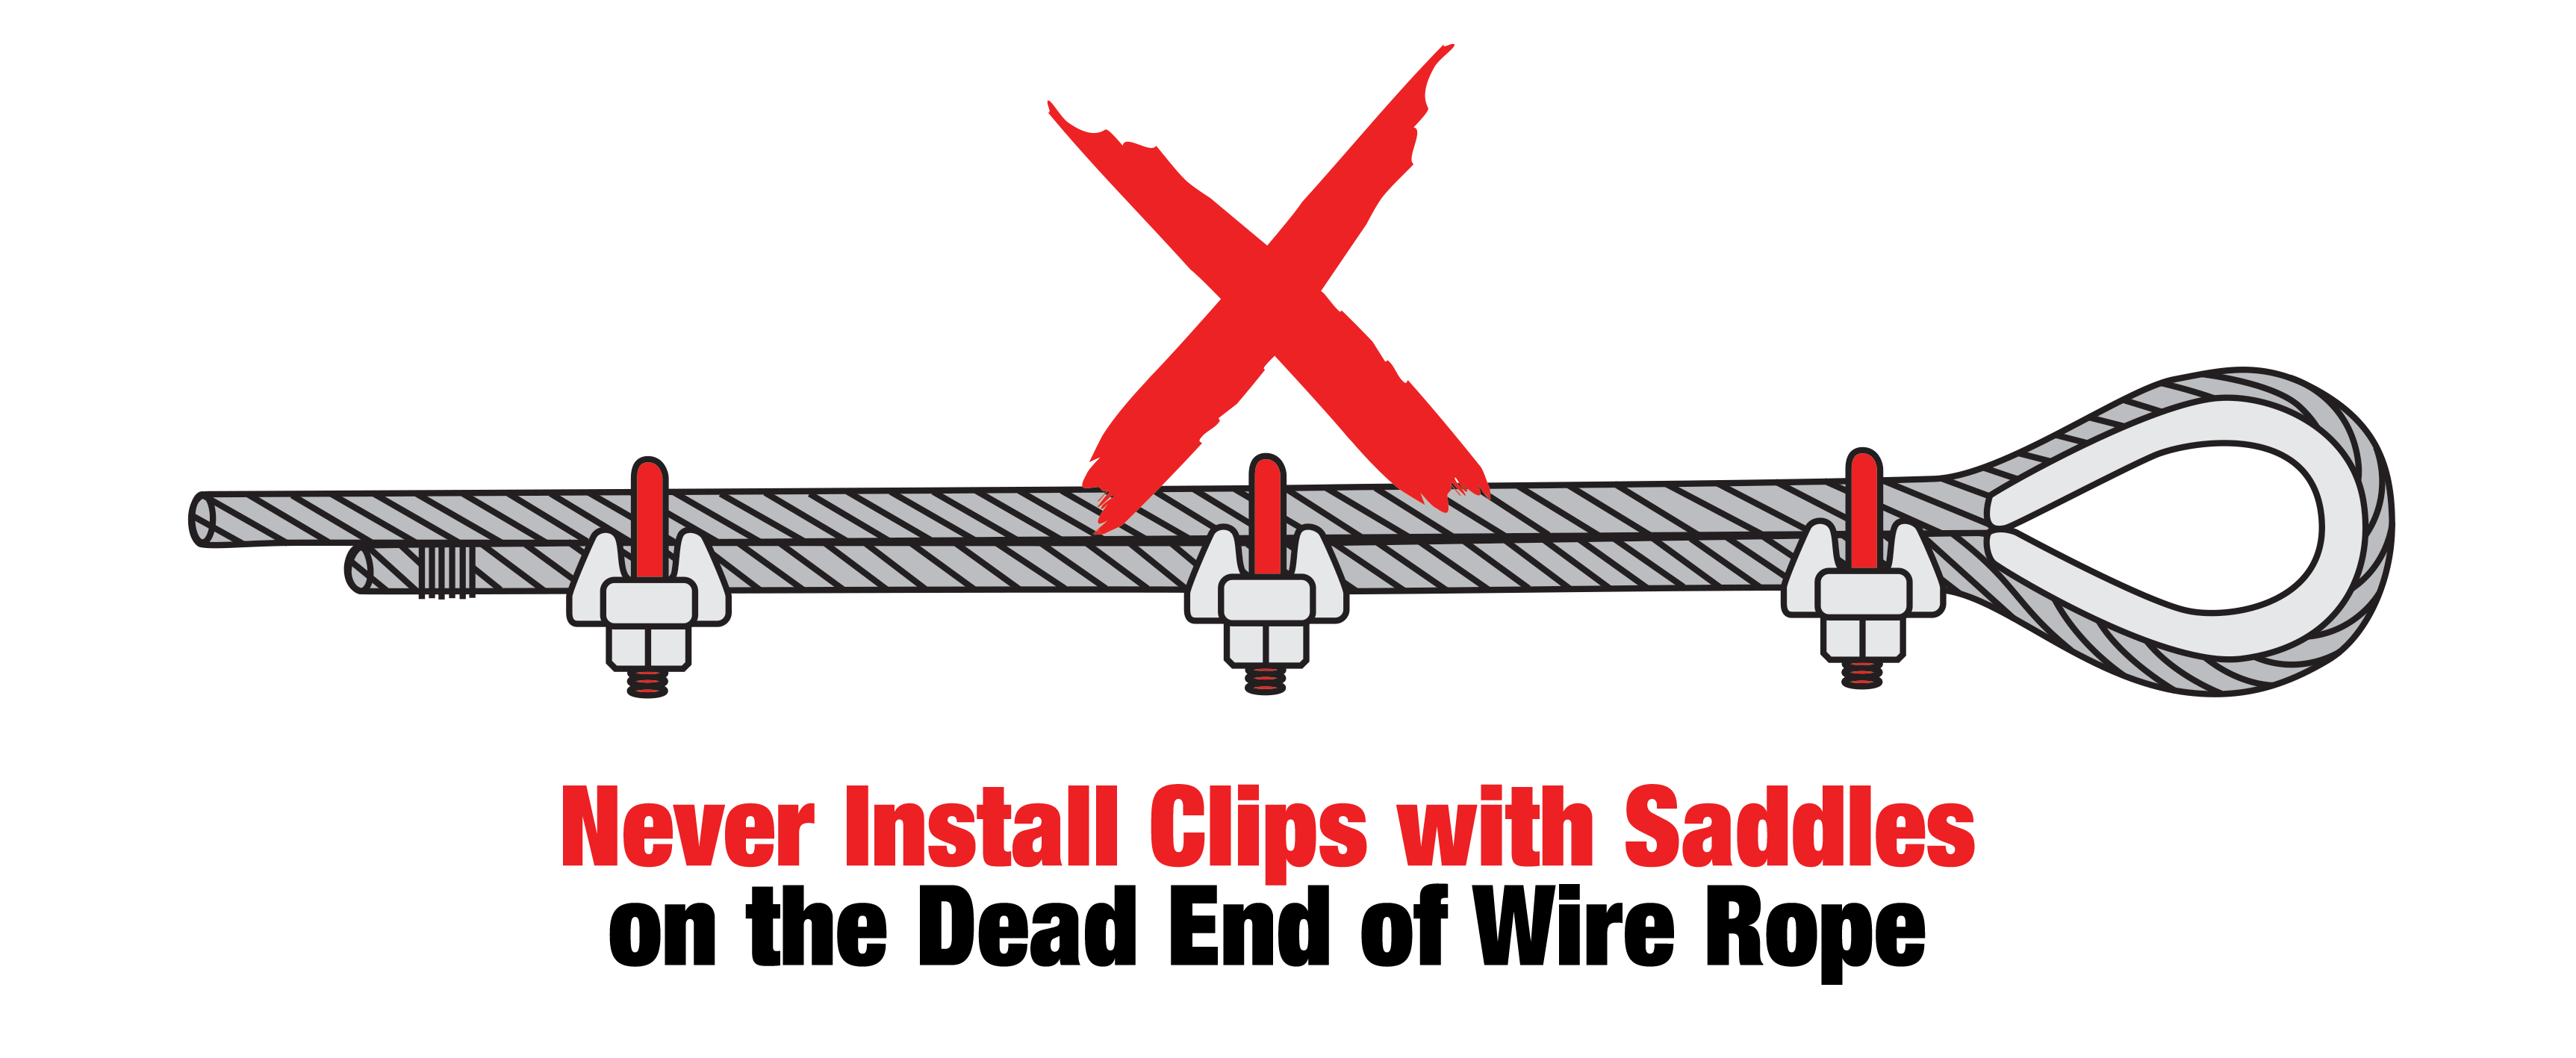
It’s one of the most popular lifting and rigging terms for a reason, as it’s an easy and memorable term to remember for proper clip orientation and installation. You should never apply the saddle of a U-bolt clip to the dead end of a rope. Instead, the wire rope clip’s saddles should always face the live end of the rope.
The saddle end of the clip holds the wire in its form, maintaining the weight capacity. The other side will kink the rope and decrease the rope’s lifting capacity. You should also never stagger your wire rope clips.
2. Properly Turn Back the Rope from the Thimble
Wrap the wire rope around the thimble to form the eye of the rope. Follow the manufacturer’s instructions to figure out the correct amount of rope needed. The first U-bolt clip you install should be one saddle width away from the dead-end part of the rope.
3. Installing Second U-Bolt Clip
The second U-Bolt clip you install should be as close to the loop or thimble as possible.
4. Use a Torque Wrench
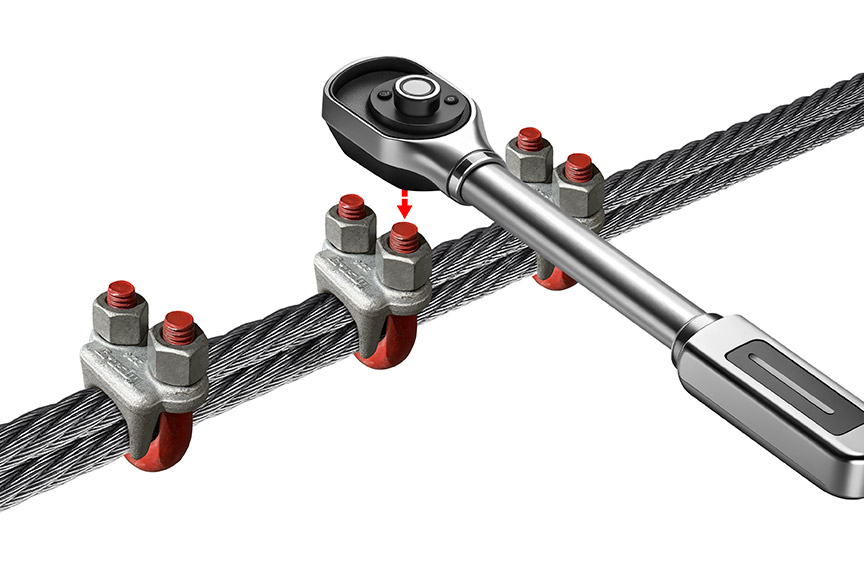
After installing the second clip, use a torque wrench to tighten the nuts evenly until you reach the recommended torque—you must torque to manufacturers’ specified guidelines.
5. What If More Than Two Clips are Required?
If three (or more) U-Bolt clips are required, space additional clips equally between the first two clips. Tighten the nuts evenly using the torque wrench to the manufacturer’s recommendation.
6. Test Your First Load
Once your U-Bolt clips are installed, you should test the load. This load should be of equal or greater weight than loads expected in use. After the test load, check and use a torque wrench to re-tighten the nuts to the recommended level, as stated by the manufacturer.
Other Important Tips to Consider When Installing Wire Rope Clips
Always Refer to Manufacturer’s Specifications
When in doubt, refer to the manufacturer’s specifications to ensure proper installation and torque settings. While practices like never saddling a dead horse are universal, each company will have certain recommendations on torquing and the amount of rope needed for a turnback.
Periodically Inspect Your Wire Rope and Clips
Inspecting your rigging equipment is essential to creating safe working environments. All rigging equipment should have a visual inspection before use, looking for cracks, gouges, kinks, or any abnormalities.
Your company should also designate a Competent Person to perform a daily, or pre-shift, hands-on inspection of hardware, slings, and all fastenings and attachments for damage, defects, or deformities. For additional guidelines on proper use, care, and inspection of wire rope clips, refer to ASME B30.26 Rigging Hardware.
Pully / Sheave
Use an extra wire rope clip if a pulley / sheave is used for turning back the wire rope instead of a thimble.
Do Not Over-Tighten the Nuts on Your U-Bolts
Over-tightening the nuts can cause a kink in the rope, which would weaken the rope and cause it to be removed from service.
What are Some Common Mistakes When Installing Wire Rope Clips?
While simple tools, it’s common to see wire rope clips not installed properly in the field. Some of the most common mistakes people make include:
Saddling a Dead Horse
One of the most common mistakes regarding wire rope clips is saddling the dead horse, where riggers place the clip saddle on the dead end if the wire rope.
Using the Wrong Wire Rope Clip Model
Pay attention to your application to determine the correct clip model to use. As mentioned earlier, forged wire rope clips are meant for heavy duty applications, such as overhead lifting. Malleable clips will be great for making eye termination assemblies only and light duty applications, such as residential fencing or other low risk applications.
Using the Wrong Number of Wire Rope Clips
The number of wire rope clips needed will depend on the size of the wire rope. Refer to the manufacturer’s specifications to learn more.
Not Torquing to the Manufacturer’s Recommendations
Not torquing the clips to the required torque rating can reduce the wire rope’s working load limit by a considerable amount—40% in some cases. To determine if you have torqued them properly, follow the manufacturer’s specifications. Torquing above the manufacturer’s specifications could damage the rope.
How Else Can You Improve Your Lifting and Rigging Processes?
Wire rope clips are one of the many tools riggers can use to improve their safety and overall rigging processes. However, simple tools, it’s important to follow instructions on proper installment to avoid failed loads and potential injuries for workers. Before conducting a lift, take a few minutes to check if your clips are installed correctly. It will be worth it.
We hoped this article helped you better understand:
- Steps for installing U-bolt and wire rope clips
- Common mistakes people make when installing wire rope clips
- The difference between forged and malleable clips
- The importance of properly torquing your clips
You should also take the time to periodically inspect your wire ropes and wire rope clips, along with other rigging equipment at your job site. We also understand keeping up with rigging inspection cadences can be difficult, which is why reaching out to a third-party can help take that burden off your shoulders.
Mazzella is a leader in third-party rigging inspections, employing an in-house team with several decades of industry experience that can perform on-site inspections for companies of all sizes and industries. Contact one of our Rigging Specialists to schedule a third-party inspection.
On top of inspections, Mazzella is also a leader in lifting and rigging training. Schedule an online, in-person, or jobsite training session.
You can also purchase U-Bolt wire rope clips on our e-commerce site.

Copyright 2025. Mazzella.